Four years ago, Microsoft released an open-source cross-platform IDE called Visual Studio Code that became very popular. (I rate it as the best IDE on Linux, which is somewhat ironic given Microsoft's past stormy relationship with open-source software).
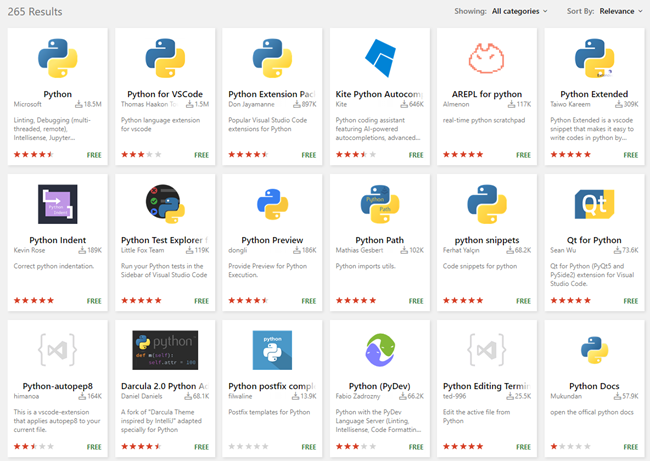
One of Visual Studio Code's strengths is its extensibility; there are currently 17,314 extensions available, with a whopping 265 just for Python alone! Those fall into various categories; and if you’re still not satisfied, you can create your own extensions.
Let’s start off by exploring how Visual Studio Code intersects with Python development.
Getting Started with Python Development
Having installed Visual Studio Code on your given platform, the first thing you should do is switch to the extensions tab. Click the bottom icon in the list on the left; then, in the Search extensions in Marketplace, type “Python.” The first result is the Microsoft authored extension; just click the install button. It only takes a few seconds to install and it will require you to do a reload (click the Reload Required button).
The next time you view the list of extensions, you'll see a small cogwheel in each one. Clicking the one for Python opens a pop-up menu; clicking Extension Settings takes you into a rabbit-hole of 158 User settings and 148 Workspaces just for Python! Most of these you won't ever touch, but I suggest you browse through to see what they can do (many have to do with data science, just FYI).
Clicking on the Python extension again will always open on a web page in a tab for the extension. This lists three steps to get coding. The first, inevitably, is to install Python itself (if you don’t have it loaded already). Windows and Mac users, you’ll need an installer to get Python in working order on your machine; the Python online documentation offers instructions on how to do this.
If you are on Linux, make sure you have pip installed. I was on Ubuntu, so I did a sudo apt install python3-pip from a terminal window (and to be on the safe side, I restarted Visual Studio Code after that).
Next, you should create a workspace folder. Visual Studio Code doesn't work on Projects, but a workspace folder with sub-folders and files below. If you wish to start another project, close the folder4 in the File menu, then “open folder” and select another.
Note all the settings files for workspace are stored in a .vscode folder in the workspace folder. If you have a program to run, load it here. At this point, you can run the program with ctrl-F5 or start debugging with F5. (One thing to note with Visual Studio Code: Whenever you need to run or debug a file, make sure it is the current open one. I found it easiest to close any other files so there is only the one open.)
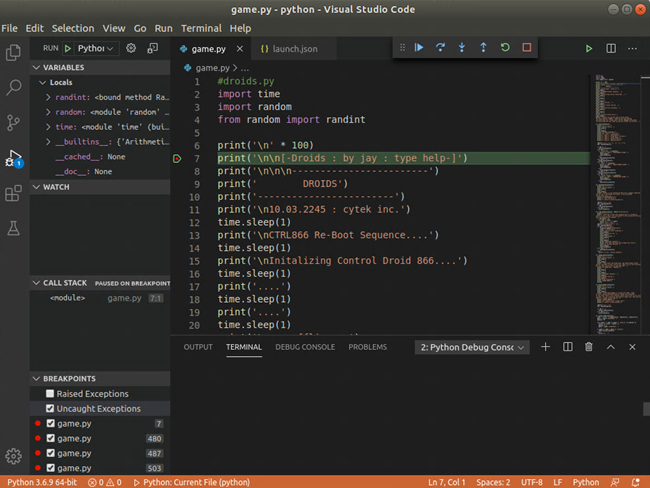
Before we can debug it, we need to configure it. When you start debugging, it will create a launch.json in the .vscode folder. Now you can debug the program, and the easiest way to do so is to add a breakpoint.
When you are in debug mode, click the triangle icon to the left, then click just to the left of the line number to toggle a breakpoint. Press F5, and it will run until it hits the breakpoint. At that point, you can see variables and the stack on the left.
Conclusion
Although Visual Studio Code is good, if you develop on a Windows machine, Python development with Visual Studio (even the free Community edition) is better and easier so long as you have the Python Development workload installed. For instance, it lets you manage virtual environments and install modules with very little effort.
But Windows aside, Visual Studio Code + Python extension makes for a great development platform.
One side note: Developer Jay Rodgers has taken the source of Visual Studio Code and created installers for Chromebooks, Raspberry Pi and other ARM and Intel systems. DEB and YUM format installers are available for Linux. It's not officially supported by Microsoft, but the installers are built from source code in Microsoft's official repository.