When people think of user access, they generally think of humans accessing a system. But with complex applications running on a hosted system such as Amazon Web Services (AWS), it’s not just humans wanting access; for example, computers and other devices will want “in.”
For example, you might have a dozen Linux servers hosted on AWS that need to access a database (also hosted on AWS). Moreover, these Linux servers need hard limits on their behavior: Can software running on the servers create new databases? Can they modify the data, or only read it?
Understanding user access is fundamental to working with AWS, to the point where the platform includes an entire service called Identity Access Management (IAM). Let’s break down the intricacies of how access can work.
Limiting Users
AWS is a massive system with many different services (over 130 of them), including databases, hosted servers, other storage areas (including S3, which has been in the news a lot recently), private networking, developer tools, IoT, and more. It also touches on pretty much every platform within the broader tech ecosystem, like it or not.
Now think about two different scenarios:
In the first, a new employee joins your company and needs access to AWS so that he or she can allocate some new Linux servers. Do you want this employee to accidentally wipe out all your S3 data? Probably not. Clearly, you’ll want limits on what that employee can do.
Now for a second scenario: You have a Linux server hosted on AWS, and the software on that server needs to read data stored in S3. Suppose somebody breaks into that server. Do you want that person, by way of the server, to be able to intentionally wipe out all of your S3 data? That’s where permissions come in, and can be tied to both people and devices.
Conceptually, limiting permissions for the new employee is easy. Many software applications provide security whereby you can make somebody a basic user with certain rights, as opposed to an administrator or root user with full rights. But what about the guy who broke in? You didn’t give him access to anything at all, so how can you limit his access?
The answer is you limit the access of the server he targeted. AWS lets you do that. That server might only have the ability to read S3 data, perhaps along with a few other abilities (such as uploading new files to S3). That means the hacker shouldn’t be able to do anything outside of the access you’ve given to that particular sever. (The key word here, though, is shouldn’t. Security is a huge topic, more than I can cover here. But what I’m offering here is a start.)
Additionally, you can grant permissions to applications running outside of AWS; for example, you might build a mobile app that can read S3 data. All of this requires restrictions on access, which is the primary purpose of IAM.
Human Users
Users (i.e., humans) have two different ways to access AWS: Through the web-based management console, and programmatically by running command-line tools. For the management console, you provide a username and password, along with additional (optional) security such as two-factor authentication. For the command-line tools, you provide the user with an access ID key and an access secret key; the ID key is analogous to a username, and the secret key is analogous to a password.
The dozens of possible permissions within the various AWS services are fine-grained, and usually describe one action. For example, one allows a user to save an object (i.e., a file) in S3; there’s another for deleting objects from S3. AWS even lets you take it a step further and specify which S3 bucket the user can access, and then you can take things another step by specifying whether a user can change permissions on an object within a bucket (such as private to viewable via a URL).
In order to dictate which bucket a user can access, you create a policy, which contains the permissions (such as the ability to read an S3 bucket); that way, you can put a list of permissions into a single policy, and finally attach that policy to a user, organized however you see fit.
Note that, in AWS, every individual “thing” (such as a specific bucket or a specific object inside a bucket) receives a unique identifier known as an Amazon Resource Name (ARN). When creating policies that need to grant access to one of these “things,” you use the thing’s ARN.
Users can only access whatever you grant specifically grant them. However, the policies can specify that a permission is granted or that a permission is denied. You might, for example, grant read access to an entire bucket—except for one particular object (to accomplish that, you would specify “allow” for reading the bucket, but “deny” for reading the specific object in that bucket).
Blurry Lines
Software you create that runs on EC2 servers accesses AWS resources via software APIs. These APIs allow you to access the entirety of your resources on AWS. As such, you’ll want to limit what the software can access (for security, if nothing else). In order to make the API calls, the software needs to provide credentials (internally, these credentials are passed with every API call). AWS will check those credentials and determine whether they allow the software to access the resource.
For example, the software might provide credentials that allow it full access to S3, but no credentials for accessing DynamoDB (one of the AWS database services); attempts to access S3 will be granted, while attempts to access DynamoDB are denied.
How does your software provide these credentials to AWS?
With API calls, you provide an ID key and a secret key. But wait! Those are normally given to human users, not software, for the purpose of using command-line tools. If you want, you can create a user in AWS and set it up for API access only; then you can store the ID key and secret key somewhere on the server’s drive, and the application can grab the key combination and use it for access in the same way the human would.
That will work fine, and nobody will stop you. Many AWS customers do it exactly this way. But there’s a problem. What if that ID key and secret key is compromised? In fact, if somebody breaks into your server and locates the file containing the keys, he or she could save them and have free reign on whatever credentials are tied to those keys. If you didn’t know the break-in occurred, you might be unaware that somebody out there is accessing your data and damaging or stealing it. Revoking the keys, generating new ones, and updating keys to servers is a lot of work.
Good thing there’s an alternate approach.
Adding Roles

With this different approach, your software will still make API calls; internally, those API calls will still provide AWS with an ID key and secret key.
However, you won’t have to provide those keys in your code; instead, the code inside the SDK that Amazon created will request a temporary key set from AWS; this key set will be used in subsequent API calls automatically, without you having to provide them in your code. These keys will be temporary; after they expire, the SDK will request another one from AWS. This all happens behind the scenes, within the SDK—and you don’t have to even worry about it.
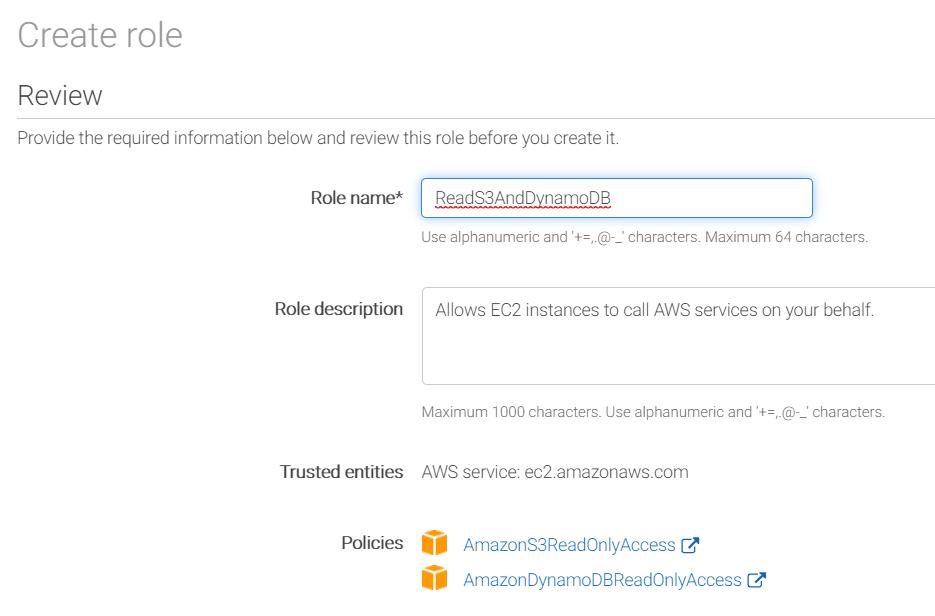
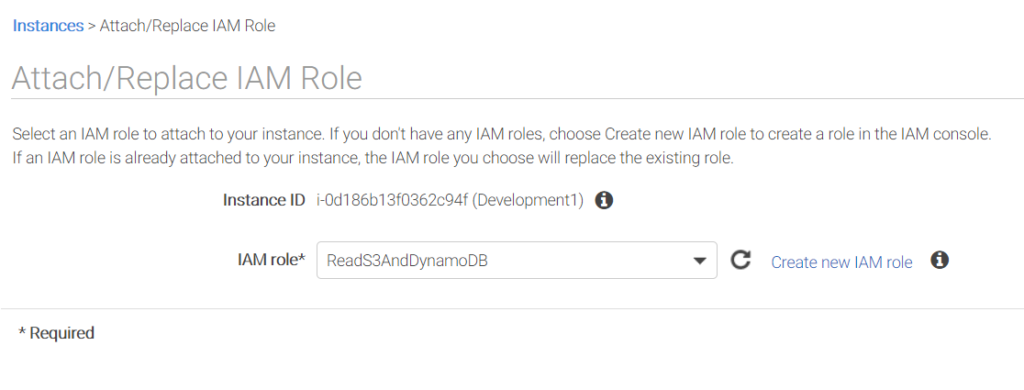
In order to make this work, you create what are called roles, which contain policies, and you attach these roles to the servers running your code. AWS makes this easy; you simply create a role by giving it a name, before attaching whatever policies you need to that role. Finally, you attach the role to your EC2 servers.
Note: You can only attach a single role to the server, so you’ll want to include in your role all the policies the server needs (you can change the role later, adding or remove policies to it as needed).
With these changes in place, your security is increased. If the intruder uses some debugging tools and is able to extract the keys from the running application, the keys will not be valid for long before AWS expires them and creates new ones. Your server will just continue operating, and any stolen key will be worthless. It’s not 100 percent secure, but it’s a big step in the right direction.
In the case of changing the access for these servers, you don’t even need to touch the individual servers; instead, you just change the policies that are attached to the role. The web console makes this easy. (You can also do it programmatically. Everything in AWS can be automated.)
As soon as you do that, the next API call the servers make will have the updated credentials. If you previously allowed the role to delete an S3 file, but then revoked this right, the code will not be allowed to delete an S3 file. It’s a quick and easy change. (Or if you want to add additional software to your server, with different rights, you can modify the role and add additional policies that the new software needs, all while managing access from a single place.)
Summary: AWS Permissions are Tricky
To recap: You can create policies from permissions to grant and deny access to specific resources that you own on AWS. These policies can then be attached to either users or roles.
Users usually refer to humans, although technically you can use the user keys in API calls. Roles are given to resources, which in turn allow those resources to access other resources inside your own AWS infrastructure. You use the IAM service to manage your users, roles, and policies.
In order to access the IAM permissions, you need to set up a root user on your AWS account. From there, you can create additional users with limited rights (whether you want those users to be able to create other users is up to you). Whatever you do with AWS, you need to fully understand IAM—and the impact of permissions—before launching your first projects.