Earlier this year, Apple executives unveiled Swift, which is meant to eventually replace Objective-C as the programming language of choice for Macs and iOS devices. While Objective-C remains popular, developers frequently complain about how difficult it is to use; Swift’s features will supposedly eliminate at least some of those issues. Despite its ease of use, developers will still need to spend some time learning how the language works. This is the first of a few articles that show how to program iOS apps using Swift. Click here to find Swift development jobs.
Prerequisites
 You need a Mac that can run OS X Mavericks. At the time of writing, you can only program in Swift if you are a registered iOS developer. In order to develop and run Swift apps, you should have iOS 8 and version 6 of Apple’s IDE Xcode. (You need to be a registered developer in order to test your Swift apps on your iPhone, although you don’t need to be one in order to create and run those same apps on an iPhone or iPad emulator.) For the purposes of this tutorial, I’m using a beta version of XCode 6 (as of this writing, now up to GM seed). Before we start, please download the project files and (if you are a registered Apple developer with the latest Xcode beta) install them. After that, open the project files and load them into Xcode.
What's In a Swift App?
To build a Swift app, first, you'll create an Xcode project and select Swift as the language. After filling in a few details, the software will create a project that, in my case, I named FirstExample. It will contain two source code files to start, as well as two info.plist files that hold information about your App and a storyboard file (which we won't need for this example). These assets are the minimum you need to a build an app capable of running. But if you run it at the outset, you’ll just get a blank screen—you’ll have to add more code to make it do anything. We’ll come to that part soon.Upload Your ResumeEmployers want candidates like you. Upload your resume. Show them you're awesome.
Other Preparations
If you're following along and have created a new app, there will be a Main.storyboard file in the Project Files list. Please delete it and edit the info.plist file. Remove the key that starts with, "Main storyboards file name." The two source code files are AppDelegate.swift and ViewController.swift. In iOS, a delegate is a class that does something on behalf of another class, and the AppDelegate is a place to handle special UIApplication states. It has a bunch of functions called by iOS. For instance, if your App is in use and the phone rings, then the function applicationWillResignActive will be called. This is where you should pause tasks, disable timers, etc. Here's a list of functions that are stubbed in AppDelegate.swift. If your application supports background processing, then applicationDidEnterBackground is called, otherwise applicationWillTerminate. These functions are places to add code to save data, but we will only use the first one:If the first function definition has NSObject: AnyObject, change it so it reads NSObject: NSDictionary. This is the function to which we need to add code; it’s where everything starts. The -> Bool means it returns a bool value, i.e. true or false. If something goes wrong in your code when the app starts, it will return “false” (but in our case, it'll always return true).func applicationWillResignActive(application: UIApplication)
func applicationDidEnterBackground(application: UIApplication)
func applicationWillEnterForeground(application: UIApplication)
func applicationDidBecomeActive(application: UIApplication)
func applicationWillTerminate(application: UIApplication)
Adding Code to AppDelegate.swift
This is what the whole AppDelegate.swift file should look like. I've removed comments to keep it short:import UIKit @UIApplicationMain class AppDelegate: UIResponder, UIApplicationDelegate { var window: UIWindow?In Swift you create an instance of a class like this: window = UIWindow( .. ) to create an instance of UIWindow. This is just one parameter passed in, and it's named frame with the value UIScreen.mainScreen().Bounds, which specifies the size of the whole screen. Note that window is defined in the class as UIWindow?. The question mark means it's an optional type and that the value can be absent or present; this is similar to a nil value in other languages, but it works for all types not just classes. The if let window = checks that the window is present and unwraps window (which is of type UIWindow?) so that the UIWindow properties and methods can be used. Try commenting out the “if let” line and the corresponding "}" (using //), and you'll get three similar compile errors, with the first one saying that backgroundColor is not a member of UIWindow? It’s a member of UIWindow, so to get from UIWindow? To UIWindow, it needs unwrapping; add a “!” on the end of the variable name to unwrap it (window!.backgroundColor = will work). That being said, without the unwrapping provided by "if let," each window.reference in the block would also need to be window!. “If let” does all three unwraps. The lines within that statement set ViewController as the root view controller, which is the first one created. The view controllers you implement control the entirety of your app’s navigation. Apple's About View Controllers is well worth reading if you want to understand the whole concept; however, in this instance, we’ll cover just one example. But what exactly does a view controller do?func application(application: UIApplication, didFinishLaunchingWithOptions launchOptions: NSDictionary?) -> Bool {
window = UIWindow(frame: UIScreen.mainScreen().bounds) if let window = window{window.backgroundColor=UIColor.whiteColor()
window.makeKeyAndVisible()
window.rootViewController=ViewController()
} return true } func applicationWillResignActive(application: UIApplication) {} func applicationDidEnterBackground(application: UIApplication) {} func applicationWillEnterForeground(application: UIApplication) {} func applicationDidBecomeActive(application: UIApplication) {} func applicationWillTerminate(application: UIApplication) {} }
What Is a View Controller?
An iOS device’s screen area is managed by one or more view controllers, which are used for both navigating between forms and for managing views on a given form. A view is an instance of a UIView or a subclass of a UIView, and manages a rectangular area on the form. If the form is the equivalent of a bricks-and-mortar office, the form view controllers would be the managers in that office, and the views are the employees who actually perform the work. Each form in an app is managed by one and (sometimes more) view controllers. If a form has a fixed part and a scrolling part, you might use a different view controller for each part. In this app, there's one view controller for the controls, and one that manages the pop-up alert when you click the button. The main view controller in my app has a view comprising a Label (UILabel), a text edit box (UITextField), and a button (UIButton). When you run the app, type in some text into the text edit box, then click the button. This will pop up an alert message displaying the text you typed: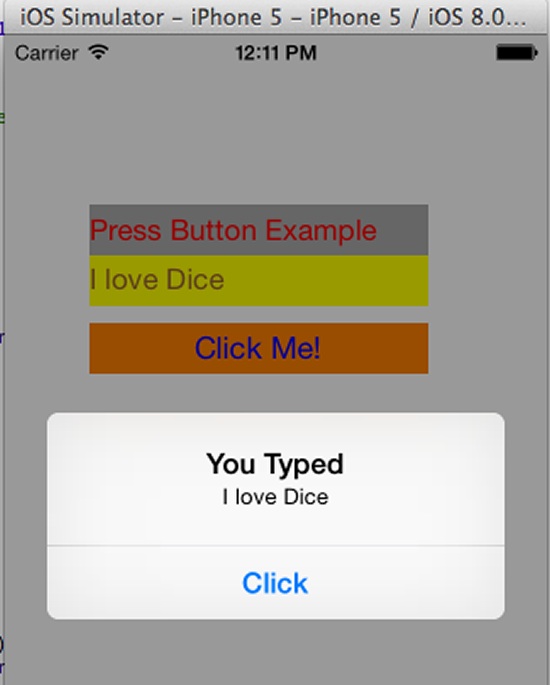 You can also visually design the user flow through your app using storyboards, which rely on less code and help eliminate errors that you'd get with manually managing view controllers in code. In this example, though, everything is created in code in ViewController.swift.
Views and View Controllers
Each view controller has a view property that's a collection of UIViews. The controls that you place onscreen are all subclasses of UIView, and are added to this view. In our example, the view is created in the overridden view controller's viewDidLoad() method. I've coded this to call the function makeLayout(), where the UILabel and UIButton controls are created. The UITextField was created at the class level because it needs to be accessed in the function buttonAction(). All three controls have their properties set in makeLayout(); a control does not appear until it is added to the view by calling the view controller's view.addSubview() method. The ViewController class starts like this:import UIKit class ViewController: UIViewController {The variable msg holds the string that is typed in. Because we need to access the text field outside of the makeLayout() method (see below), it's created at the class level.var msg : String="Some text"
let MyEdit = UITextField(frame: CGRectMake(50, 130,200,30 ))
override func viewDidLoad() {super.viewDidLoad()
makeLayout()
}
func makeLayout() {This method is in three parts; the first creates a UILabel control with the statement:let FirstLabel = UILabel()
FirstLabel.text = "Press Button Example"
FirstLabel.textColor = .redColor()
FirstLabel.backgroundColor = .lightGrayColor()
FirstLabel.textAlignment = .Left
FirstLabel.numberOfLines = 1
FirstLabel.frame = CGRectMake(50, 100, 200, 30)
view.addSubview(FirstLabel)
// MyEdit has already been created so just set the properties and add the control to the viewMyEdit.text = "type here"
MyEdit.backgroundColor = .yellowColor()
MyEdit.textColor = .brownColor()
view.addSubview(MyEdit)
let FirstButton = UIButton()
FirstButton.setTitle("Click Me!", forState: .Normal)
FirstButton.backgroundColor = .orangeColor()
FirstButton.setTitleColor( UIColor.blueColor(), forState: .Normal)
FirstButton.frame = CGRectMake(50, 170, 200, 30)
FirstButton.addTarget(self, action: "buttonAction:", forControlEvents: .TouchUpInside)
view.addSubview(FirstButton)
}
let FirstLabel = UILabel()The next six lines set the FirstLabel properties. Note that the compiler is smart enough to know that .redColor() is short for UIColor.redColor(). Finally, the control is added to the view with the addSubview() statement. The UITextField control was already created at the class level, so here we just set the properties and add it to the view. The button is created, the properties set, and it's added to the view. The UIButton.addTarget() method has an action parameter that specifies the name of the function to be called when the button is clicked, and it has a trailing ":" like "buttonAction:". This calls the imaginatively named buttonAction() method.
func buttonAction(sender:UIButton) {The buttonAction() method assigns the text string from the text field to the msg variable, which is then displayed by the ShowAlert() method. This uses the new iOS 8 UIAlertController, which replaces the old UIAlertView (now deprecated). The showAlert() method creates an instance of a UIAlertController, adds an action so you have something to click, and then calls presentViewController(), which is one way for a view controller to switch to another.msg = MyEdit.text
showAlert(sender )
}
func showAlert(sender:UIButton) {var alert=UIAlertController (title:"You Typed", message:msg, preferredStyle:UIAlertControllerStyle.Alert)
alert.addAction(UIAlertAction(title:"Click",style:UIAlertActionStyle.Default,handler:nil))presentViewController(alert,animated:true,completion:nil)
}