In the remote control, physical computing and Internet of Things ecosystem, it's frequently convenient to command something to move using an on-screen slider. In my case I'd like to control a pair of servos from my
Linux notebook for an Internet-enabled prototype I'm working on. Sometime in the future I'll port the sliders over to a little app on my Galaxy S3. This article covers how to hack together a rudimentary notebook user interface connected to an
Arduino microcontroller using the
Processing programming language. The high-level requirement for this prototype is pretty simple: Use on-screen sliders to pan and tilt a tiny flashlight back and forth and up and down. I chose Processing because it's a fairly simple and powerful language that hides much of the low-level programming details in external libraries. Both the Arduino and Processing have respective libraries to handle serial communications. Shipping data out to the Arduino is fairly straightforward. Just call a few library functions on each side and poof, you're communicating. Not only does Processing provide a quick way to develop prototype applications on a notebook, it also serves as part of the back end for the Arduino IDE. Constructing code for a basic user interface on a notebook is pretty much the same as coding a program for the Arduino. Loops, decisions, data handling and syntax are all the same. In fact, you could use the Arduino IDE to program in Processing for the notebook and vice versa. But I'll stick with the Processing IDE for the notebook part and the Arduino IDE for the microcontroller part. There are reasons to use separate IDEs, which I'll explain as we proceed. I've found Processing easy to work with and appreciate being able to develop prototype code quickly. Readers can certainly adapt my logic to their language of choice.

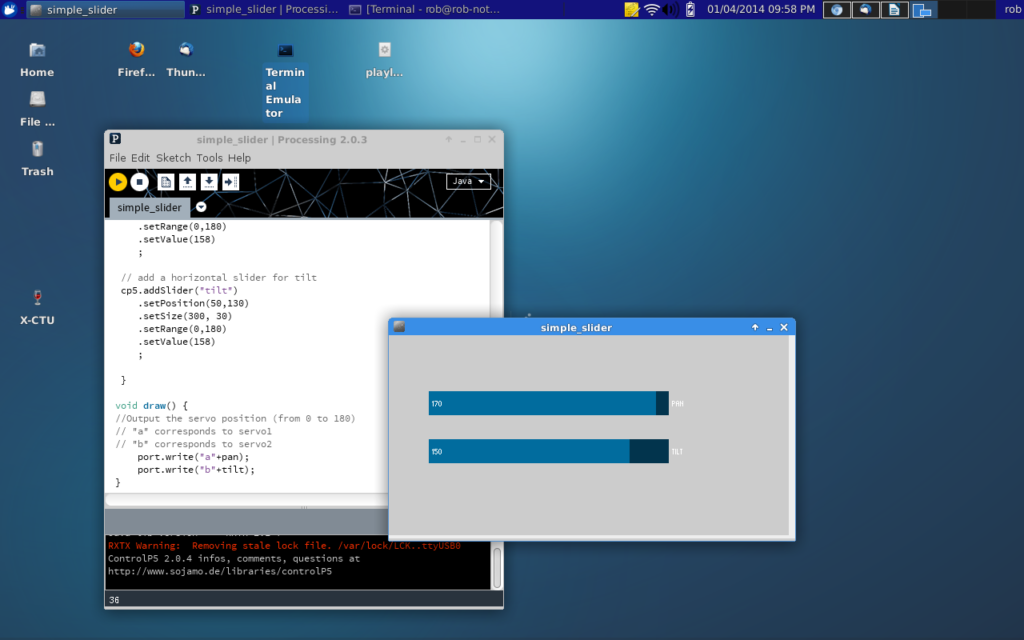
The image above shows the Arduino and gold-colored flashlight attached to a servo. The other servo will soon be attached to tilt the flashlight up and down. The graphic below shows a screenshot of the pan and sliders in a small graphics frame on the desktop of my Xubuntu-powered Asus notebook. Don't worry,
the Arduino IDE works
on Windows and
Macs, as well. Look at the
Processing page for Linux, Windows, and Mac OS X downloads.
We can gloss over the “mechanics” of hooking up the servos to the Arduino. The control pins on the servos simply go to digital I/O pins nine and 10, respectively. Likewise, the servo plus sides and grounds to the +5 volts and GND, respectively, on the Arduino. Power for the Arduino comes from the USB cable connected to the Linux notebook. I used tiny RC nanoservos that don't pull much current. When using larger servos, make sure to get your juice from a separate, well-regulated voltage source, otherwise you'll likely exceed the capacity of the on-board Arduino voltage regulator. Much of the code came from the Arduino site.
This particular example used Processing to capture a mouse movement and send servo commands to the Arduino. On the website you'll see both the Arduino code and the Processing code. I replaced the mouse code on the Processing/Notebook side with slider code from the
ControlP5 library. My Arduino code has a minor tweak or two, as well. First, here's the Arduino code.
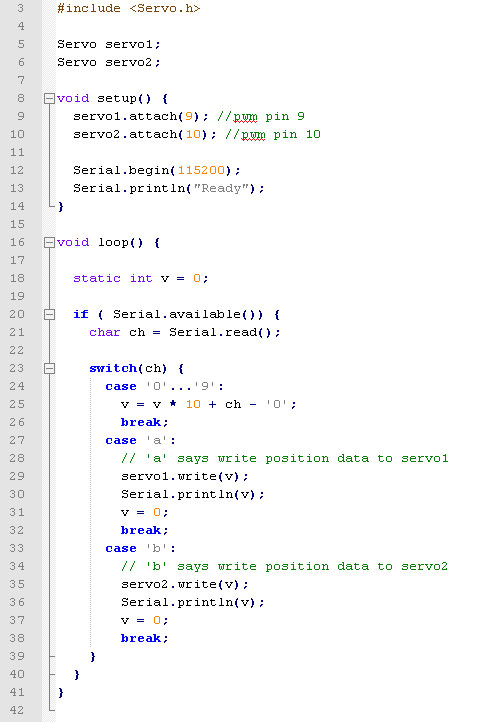
The Arduino code sets the two digital I/O pins needed to control the two servos. Then it sets up communication over the serial line. After that, it just loops through reading characters as they are received from the serial port. It records numbers until it comes to either an “a” or a “b”. If it gets an “a” it drops out the case statement and writes the number to the servo.write() function, which moves to the specified position (from 0 to 180). Numbers out of range don't affect anything. Neither do letters other than a and b. I used the Arduino IDE to write, compile and upload the code to the microcontroller. The Arduino IDE also has a built-in serial monitor, making it easy to send commands to the servos from inside the IDE. For example, typing “90a” in the serial monitor moves servo1 to the 90 degree position. Similarly, typing “90b” moves servo2 to 90 degrees. I plan to use an “l” to toggle the light on and off through one of the digital I/O pins. Along with the firmware on the Arduino, Processing code is needed on the Linux desktop to have a nice simple set of sliders that control the servos. Here's the Processing script with the enhanced ControlP5 slider code.
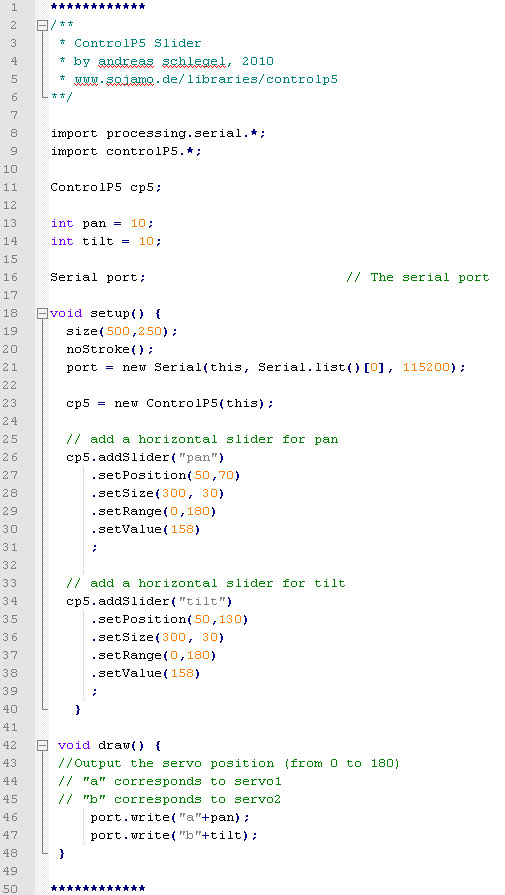
I used the Processing IDE to write this code. The big difference between it and the Arduino IDE is that there's no built-in serial monitor or capability to run the compiler or uploader for the Arduino. Processing sketches are interpreted and run from the IDE. Write your code, run it and up pops a window with slider controls for the Arduino. Naturally, the Arduino code should be running and hooked up to the USB port before you run the slider sketch. If you get an error when running the Processing slider sketch, you might need to tweak the serial port settings. If you use a serial baud rate different from 115200, make sure to use that number in your sketch. 9600 and 57600 are common. Execute the following in a terminal from the command line, then run the slider sketch.
rob% stty -F /dev/ttyUSB0 115200 -cooked In a nutshell, that’s how you put a slider on your Linux desktop that controls a pair of servos hooked up to an Arduino board. Enhancements for my project will include the aforementioned light on/off capability and certainly the ability to send the commands over Wi-Fi. I'll either use a
Spark Core or an
Arduino Yun for the Wi-Fi build. That part will go towards controlling the servos from a Wi-Fi-enabled smartphone.