It seems like every software developer from Silicon Valley to Silicon Alley is jumping aboard the cloud-app bandwagon at the moment—which means, if you’re in the business, that it’s worth your time to get to know the Big Kahuna of the cloud-infrastructure space, Amazon Web Services (AWS). For anyone who hasn’t worked with AWS before: it might be huge and sophisticated, but it’s also surprisingly easy to integrate into applications. Let’s look at how you can program AWS with Microsoft C# and Visual Studio. Specifically, we’ll look at how to store data in the AWS cloud storage known as S3. To get started, you have to sign up for an AWS account and pick up a private key for use in your program. Only solutions that hold this key will be able to save and retrieve data from S3. Second, you’ll need to configure your application in Visual Studio to use AWS. Here’s a step-by-step approach.
Starting Out
Head over to
http://aws.amazon.com, click the “Sign Up” button, and follow the steps for registering. You’ll need to have your phone handy, because an automated system will call you and you’ll have to enter a PIN. This is so that Amazon can verify that you’re actually a human. Once you’re verified—good to know you’re human, at least for today—sign into your account and go over to the console. You can find it by floating your mouse over the “My Account/Console” drop down in the upper-right rail, and clicking “AWS Management Console.” On the console, you’ll see a list of all the services available; find S3 and click on it. At that point, the main S3 page will open. S3 is where you store your files in the equivalent of folders, called “Buckets.” Click “Create Bucket” and you’ll see the screen shown below. Create a name for your bucket in all lower case. Here’s the rub: The name must be unique among Amazon users. A good way to ensure that uniqueness is to include your user name along with the bucket name. Leave the “Region” alone, as it will default to one for you. Finally, click “Create.”

In this example, we’re going to manually upload a file to our bucket and read it from our C# program. After uploading the file, you’ll see a screen divided in half, with the left half showing your buckets and the right half showing information about any bucket you click on. (Click on the blue area around the bucket to see information about it. Click on the bucket name to manage it.)

Go ahead and click on the bucket name. You’ll see a screen telling you the bucket is empty. On the upper left, click the “Upload” button. A window will open, and from there you can upload your files. This screen offers a couple of different methods you can use, one of which requires you to have Java installed. Click “Add Files” and find a file you’d like to store. For this example, you can use any file, such as an image. Just make sure it’s not too big, because you don’t want to wait forever for it to upload. Once you’re ready, click “Start Upload.” Here’s the upload screen:

Once uploaded, the file is stored in S3 and you should see it listed on the left side of the bucket information page. That’s it. Now let’s head over to Visual Studio.
Working in Visual Studio
Create a new C# console application. In my Visual Studio 2012 copy, I’m calling my project AWSTest.

Make sure you have installed the NuGet Package Installer. You can find instructions
here. NuGet is a vital tool for developing applications with Visual Studio; if you don’t already have it, you’ll definitely want to get it—not just for working with S3 but for other projects as well. After you’ve created your project, go to the Solution Explorer and right-click on the References folder. In the resulting pop-up menu, click “Manage NuGet Packages.” The NuGet window will open. In the upper right box, where it says Search Online, type in “Amazon Web Services.” You’ll see a list of packages related to that name.

Click on “AWS SDK for .NET.” Note in the right-hand box that it says “Created by: Amazon Web Services.” Click the “Install” button that appears to the right of it. Another pop-up box will appear, telling you that the library is installing. Once finished, click “Close” in the lower right corner. You now have the AWS SDK added to your program. Let’s try it out. Before you proceed, you’ll need a security key from Amazon. Go back to the management console in the Web browser. Click your name, found in the upper right corner, and click “Security Credentials” in the drop-down. A new screen will open. You’ll probably see a message about accessing with root credentials. For now, just click “Continue to Security Credentials.” Click on the little plus symbol next to Access Keys, then click “Create New Access Key.”

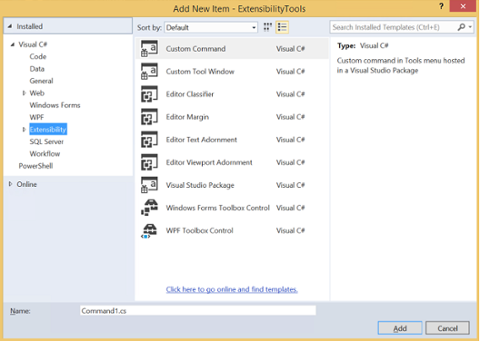
As soon as you do so, you’ll see a pop-up confirming that your key has been created. Click “Download Key File” to save it to your computer. Then click “Show Secret Access Key.” You’ll see an Access Key ID and a Secret Access Key. Leave this window open because you’ll need to reference it shortly. Then head back over to Visual Studio. Once there, right-click on your project name in Solution Explorer. In the popup menus, click “Add -> New Item.” In the resulting dialogue box, find “Application Configuration File” and click on it. Leave the name as-is (it should be
App.config) and click “Add.” A new XML file will be created and added to your project. Now let’s add the key information. Inside the outer element called Configuration, add an element called appSettings. Inside that, add two elements called “add,” like this:
<?xml version="1.0" encoding="utf-8" ?> <configuration> <appSettings> <add key="AWSAccessKey" value="1234567" /> <add key="AWSSecretKey" value="abcdefghijklmnopqrstuvwxyz" /> </appSettings> </configuration>
Go over to the browser window, select and copy the Access Key ID and paste it in the first of the add keys, over the part where I put “1234567” in this sample. Next, go to the browser, grab the secret access key, and copy it over where I put all the letters of the alphabet in the sample code above. Now save your file and close it. For this example, we’re simply going to download the file from Amazon’s S3 servers. Though it’s only a download, it will show you the process for working with AWS in general. In Visual Studio, open the
Program.cs file. At the top, under the existing “using” lines, add the following:
using Amazon; using Amazon.S3; using Amazon.S3.Model; using System.IO;
Then, add the following code inside your main function:
AmazonS3 client; using (client = Amazon.AWSClientFactory.CreateAmazonS3Client(RegionEndpoint.USWest2)) { GetObjectRequest objrequest = new GetObjectRequest(); objrequest.BucketName = "mybucketdicenews"; objrequest.Key = "aws_createbucket.png"; using (GetObjectResponse response = client.GetObject(objrequest)) { response.WriteResponseStreamToFile("aws_createbucket.png"); } }
Replace “mybucketdicenews” with the name of your bucket, and “aws_createbucket.png” with the name of the file you uploaded. Then compile and run the program by pressing “Ctrl+F5.” You’ll see a console window open. In a moment you’ll see the words “Press any key to continue.” That means your program is finished. With either a command prompt or through Windows Explorer, head over to the folder where you created your project (if you didn’t manually choose a location, it will be in the folder c:usersjeffDocumentsVisual Studio 2012Projects, replacing “jeff” with your username). Navigate down into the folder called “bin,” and under that the one called “debug.” You’ll see the file you created. If it’s an image, you can double-click and open it with your image viewer. Yes, it worked.
Conclusion
Note that you don’t need to keep creating new keys; once you have yours, you can re-use it in your applications. There are many services in AWS, including EC2 (which is where you allocate cloud servers) and DynamoDB (a modern NoSQL database). Once you master the techniques shown here, you’ll be able to easily code for those platforms as well. Happy coding.
Images: Amazon